Decommissioning procedures
This section contains detailed instructions to decommission your system.
Decommissioning is permanent. You can not recover, reinstall, or retrieve any part of Power Operation after decommissioning.
Decommissioning automatically:
-
Removes Windows user groups and users that were added during installation.
-
Removes Power Operation, excluding user log data in the Data folder. Removes registry entries related to Power Operation.
Decommissioning does not:
-
Remove user log data in the Power Operation Data folder.
-
Remove or detach database engines or delete the database file(s).
-
Completely restore your computers to the state they were in before Power Operation was installed. Decommissioning does not remove third-party software used by Power Operation (for instance, McAfee Application Control and the .NET framework), even if this software was installed using the Power Operation installer.
-
Remove Power Operation data that has been exported or Power Operation information in third-party software. This includes, but is not limited to:
- Data exported to Power Monitoring Expert. To decommission Power Monitoring Expert, see the Power Monitoring Expert System Guide.
- Data exported to other systems using EcoStruxure™ Web Services (EWS), OFS, DDE, ODBC, CtAPI, FTP, CSV, SQL, or any other data export method.
- Registration information shared with Schneider Electric.
- Diagnostics and Usage data sent to Schneider Electric.
- System information sent to Schneider Electric for licensing.
- Power Operation License Configuration Tool.
- Power Operation information configured in third-party allowlisting software (McAfee Application Control, Sentinel System Driver).
- Files or data copied, backed-up, exported, or otherwise saved to a file location other than the Power Operation folder.
Destroying or Overwriting
Destroy or Overwrite computer media hardware in your Power Operation system, depending on your requirements. For example, you can choose to destroy your Power Operation and Power SCADA Anywhere server(s) and overwrite your Power Operation clients and web clients.
Destroy
![]() warning
warning
hazard of physical injury
| ● | Do not destroy hard drives without the proper safety training. |
| ● | Never burn a hard drive, put a hard drive in a microwave, or pour acid on a hard drive. |
Failure to follow these instructions can result in death or serious injury.
NOTE: If you do not have the proper safety training, consult your IT department to select an asset disposal company.
To destroy hard drives:
- Identify all computers where Power Operation is installed. In a distributed architecture, this includes all Power Operation servers, Power SCADA Anywhere servers, Power Operation clients, Advanced Reporting and Dashboards Module computers.
- Remove all hard drives from the computers identified in the previous step.
- Destroy each hard drive:
- Puncture, shatter, or sand the hard drive plates. Follow local regulations for proper disposal of the hard drive.
- or, provide the hard drive to an asset disposal company.
- Identify all Power Operation web client computers and follow the steps below to Decommission Power Operation Web Clients.
Overwrite
notice
UNINTENDED DATA LOSS OR LOSS OF SOFTWARE FUNCTION
| ● | Only overwrite files and folders you are certain are from Power Operation with Advanced Reporting and Dashboards. |
| ● | Back-up important files from other software before overwriting Power Operation with Advanced Reporting and Dashboards. |
Failure to follow these instructions can result in irreversible damage to software and databases.
To overwrite Power Operation 2024 with Advanced Reporting and Dashboards, follow these steps:
- Select a Data Destruction Tool
- Decommission Power Operation Servers
- Decommission Power SCADA Anywhere Servers
- Decommission Power Operation Clients
- Decommission Power Operation Web Clients
- Decommission Advanced Reporting and Dashboards Module (if installed)
- Decommission Event Notification Module 8.x (if installed)
1. Select a Data Destruction Tool
Select a data destruction tool. There are many commercial and open-source data destruction tools available.
2. Decommission Power Operation Servers
The Schneider Electric Licensing Configuration Tool may be used by other Schneider Electric software. Confirm Power Operation is the only software using the Power Operation License Configuration Tool.
-
On your primary and secondary Power Operation server computers, uninstall Power Operation Software:
- Open the Windows Control Panel and select Programs and Features.
- Uninstall Power Operation 2024.
- Uninstall ArchestrA Data Store.
- Uninstall Power Operation Project DBF AddIn (if installed).
- Uninstall Sentinel System Driver Installer (if installed).
- Uninstall OPC Factory Server (if installed).
- Uninstall Cybersecurity Admin Expert (CAE) software tool (if installed).
- Uninstall Schneider Electric Licensing Configuration Tool (if necessary).
-
Delete ArchestrA and Citect Windows Security Groups:
- Delete the following Windows security groups, if they exist: Asb.Deployment.*
- Delete the following Window security groups, if they exist: Citect.Driver.Users
- Delete the following Window security groups, if they exist: ArchestraWebHostingGroup
- Overwrite Power Operation Files:
- Install your data destruction tool.
- Locate the Power Operation data folder under Program Files. The default location of this folder is
..\Program Files (x86)\Schneider Electric\Power Operation\v2024. - Follow instructions provided with your data destruction tool to overwrite the entire Power Operation data folder located in the previous step.
- Locate the ArchestrADataStore user folder. The default location of this folder is
C:\Users\ArchestrADataStore. - Follow instructions provided with your data destruction tool to overwrite the entire ArchestrADataStore user folder located in the previous step.
- Overwrite Citect Data
- Locate the Citect user authentication file MachineName.auth in your Windows user folder, where MachineName is the name of your computer.
For example, the default location for the Windows user Administrator on a computer called Standalone is
C:\Users\Administrator\Documents\standalone.auth. - Follow instructions provided with your data destruction tool to overwrite the Citect user authentication file located in the previous step.
- Locate the Citect web deployment folder. The default location of this folder is
C:\inetput\wwwroot\Citect. - Follow instructions provided with your data destruction tool to overwrite the Citect web deployment folder located in the previous step
- Locate the Citect user authentication file MachineName.auth in your Windows user folder, where MachineName is the name of your computer.
For example, the default location for the Windows user Administrator on a computer called Standalone is
3. Decommission Power SCADA Anywhere Servers
-
Uninstall Power Operation Software. On each of your Power SCADA Anywhere server computer(s). On your primary and secondary Power Operation server computers, uninstall Power Operation Software:
-
Open the Windows Control Panel and select Programs and Features.
-
Uninstall Power Operation 2024 control client.
-
Uninstall Power SCADA Anywhere.
-
-
Delete Power Operation Windows Security Groups:
-
Delete these Windows security groups, if they exist:
-
VJCAView.
-
VJCAControl.
-
-
4. Decommission Power Operation Clients
-
On each of your Power Operation client computer(s):
- Open the Windows Control Panel and select Programs and Features.
- Uninstall Power SCADA Anywhere
5. Decommission Power Operation Web Clients
-
Uninstall Vijeo Citect 2015 Web Client. On each of your web client computers:
- Open the Windows Control Panel and select Programs and Features.
- Uninstall Vijeo Citect 2015 Web Client.
-
Overwrite Citect Temporary Internet Files. On each of your web client computers:
-
Install your data destruction tool.
-
Locate the Citect temporary Internet files folder:
- Use the Windows "Run" command and enter %temp% to browse to the temporary Internet files folder.
- Locate the "Citect" folder in the temporary Internet files folder.
-
Follow instructions provided with your data destruction tool to overwrite the entire Citect temporary Internet files folder folder located in the previous step.
-
6. Decommission Advanced Reporting and Dashboards Module (if installed)
On each of your Advanced Reporting and Dashboards Module server computer(s):
-
Uninstall Advanced Reporting and Dashboards Module and ETL(Power Operation):
- Open the Windows Control Panel and select Programs and Features.
- Uninstall Advanced Reporting Module.
- Uninstall ETL (Power Operation).
-
Overwrite Advanced Reporting and Dashboards Module Data:
-
Install your data destruction tool if it is not already installed.
-
Detach ION database archives:
- Open SQL Server Management Studio, enter your password if required and click Connect to access your SQL Server.
- In the Object Explorer pane on the left, expand Databases, right-click the database archive you want to detach and click Tasks > Detach to open the Detach Database dialog.
- In the Detach Database dialog, click OK. Repeat for all ION database archives.
-
Locate your folder under Program Files. The folder contains the following subfolders:
\applications-
\config -
\Database -
\License Configuration Tool -
\License Manager -
\Setup Logs -
\system -
\web
-
Follow instructions provided with your data destruction tool to overwrite the entire Advanced Reporting Module folder located in the previous step.
-
Locate any custom Advanced Reporting Module files in folders outside of the Advanced Reporting Module folder. This may include, but is not limited to, following file types:
- Vista and Designer files:
.cfg, .dgm, .wsn, .wsg - ION databases and archives:
.LDF, .MDF - ION database backups:
.bak - Custom report packs:
.rdlc - Advanced Reporting Module (PME) System Key:
.key
- Vista and Designer files:
-
Follow instructions provided with your data destruction tool to overwrite the files located in the previous step.
-
-
Overwrite ETL (Power Operation) Data:
-
Locate the ETL (Power Operation) data folder under Program Files. The default location of this folder is
..\Program Files\Schneider Electric\ETL (Power Operation). -
Follow instructions provided with your data destruction tool to overwrite the entire ETL (Power Operation) data folder located in the previous step.
-
7. Decommission Event Notification Module 8.x (if installed)
If you migrated notifications from Event Notification Module (ENM) 8.x, you must follow these steps to decommission it. For more information, see Migrate notifications.
NOTE: ENM 9.0 does not require these decommissioning steps.
-
On each of your Power Operation server computer(s), uninstall Event Notification Module:
-
Open the Windows Control Panel and select Programs and Features.
-
Uninstall Event Notification Module.
-
-
On each of your Power Operation server computer(s), overwrite Event Notification Module Data:
-
Install your data destruction tool if it is not already installed.
-
Locate the ENM databases. By default, these are in the folder
..\Program Files\Microsoft SQL Server\MSSQL11.ION\MSSQL\DATA. It contains these files: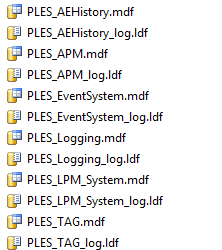
-
Follow instructions provided with your data destruction tool to overwrite all the database files located in the previous step.
-
Locate the ENM database backup files. By default, these are in the folder
..\Program Files\Microsoft SQL Server\MSSQL11.ION\MSSQL\Backup. It contains files with names similar toMM-DD-YYYY MM-DD PLES_AEHistory.bak. -
Follow instructions provided with your data destruction tool to overwrite all the ENM database backup files located in the previous step.
-